Monday, January 26, 2015

Baked Mozzarella Sticks


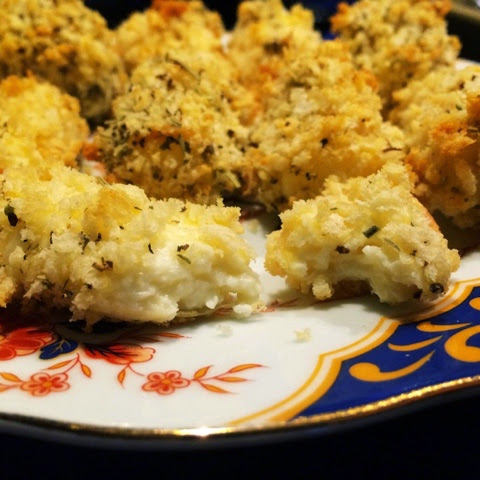
One of my favorite appetizers since childhood has been Mozzarella sticks. That cheesy ooey gooeyness mixed with the crispy outside is so delightful! My favorite is when they are piping hot and the cheese juice just runs everywhere! 


Lots of brands make frozen versions of these amazing appetizers. But none of them are as good as fresh made at a restaurant.

I want to share with you my version of homemade Mozzarella sticks! They are so easy and great for kids to help make too. There are no measurements to this recipe. Just do as much of the ingredients as you want or need.  

Baked Mozzarella Sticks
Prep time - 15 minutes
Cook time - until golden and melty 

Ingredients:
Flour
Milk
Egg(s)
Breadcrumbs
Seasonings (Italian or Herbs du Province)
Mozzerella string cheese sticks

In three separate bowls put your flour, bread crumbs and seasoning, and milk and eggs. Slice your string cheese sticks in half then dunk as follows:

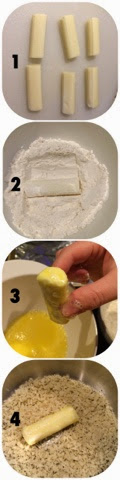
Make sure that on steps #2 & #3 that you coat the cheese completely in the flour and egg/milk mixture, this helps protect the cheese from oozing out during baking. If you are having trouble getting the flour or eggs to stick you can double dunk steps #2 and #3. Essentially doing two layers of each, flour then egg mixture, then more flour, then more egg mixture. It makes the coating a little thicker but if you are worried about your cheese melting out this will help create more of a barrier. 

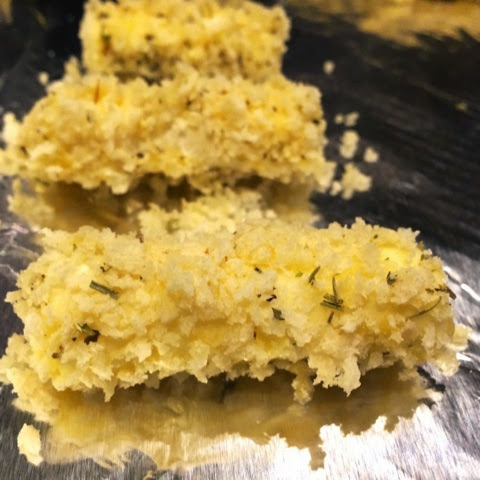
Line them up on a baking sheet (I use foil to make clean up easier) and bake for approximately 20 minutes at 350 F. Or until golden and gooey. If you want a faster baking time you can bake at 400 F. However I suggest freezing them for a half hour prior so that the cheese doesn't run out anywhere. The lower temperature seems to keep them from melting too fast while the egg cooks. 


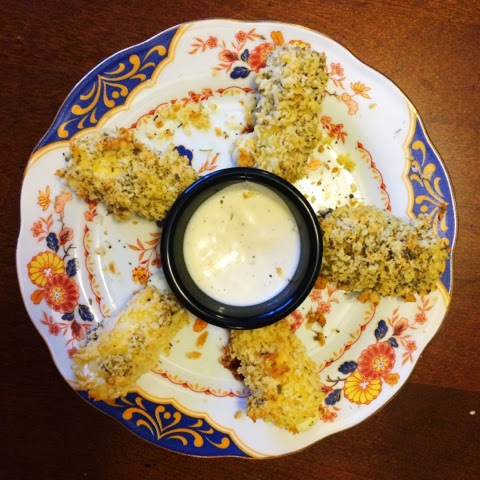
Serve with your favorite marinara or dipping sauce. These are so easy I was able to do most of it one handed while my 5 month old was teething! Make more than you think you need though because they are so delicious they will be gone before you know it!


Stay tuned for what's coming up next month! I am pretty excited about February's theme. I'll be announcing it on Feb 1 on the blog. 

Happy Eating! 

Monday, January 19, 2015

Seven Layer Bean Dip

Greetings from South Florida! I’m here at home spending some time with my family and doing some work for next months posts.


Today’s recipe is so quick and easy and requires hardly any measurements! This is a true dump cook recipe! One of the greatest things about this recipe is that you can customize every layer to your own personal tastes.

Remember, in dump cooking there is no right or wrong. Just delicious and divine! 


Seven Layer Dip
Prep time: 15 minutes
Cook time: 20 minutes

My suggested list of ingredients is as follows: 

Lettuce
Refried beans (I use dehydrated) 
Guacamole 
Sour cream
Salsa (I use Herdez canned salsa)
Black olives
Green onions
Shredded cheddar cheese
Pepperochini or sliced jalapeƱo 

You can use any variation of these ingredients. For today’s recipe I just used what was on hand in my Mom’s pantry.

I personally use dehydrated refried beans (they are so good!) to make the base layer of my dip. In order to rehydrate them I start by taking the salsa and drain it into a measuring cup. I used a 7oz can of Herdez salsa and got ¼ cup liquid from my can.

When using dehydrated refired beans the ratio of liquid to beans is 1 to 1. So if you want to use 1 cup of beans, you need 1 cup of liquids. I wanted to use ¾ cup beans, so I added ½ cup of water to the liquid from my salsa so I had ¾ cups of liquid.

Once you know your liquid/bean ratio, you can dump the salsa and liquid into a small pot. I like to add in taco seasonings to the liquid to give it even more flavor. You could go as simple as a taco-seasoning packet (only use enough to add a little flavor, maybe 1/4 to 1/2 the packet) but I like to just use a custom blend of whatever sounds good at the moment. Minced garlic, onion powder, oregano, ground cumin, would all be excellent choices.


Once you’ve added your flavor oomph, bring it all to a boil and add in your beans. Turn the heat off and stir it just to make sure all the beans are coated in the liquid so they can soften. Let it stand for about 10-15 minutes.

You can also just use canned refried beans, but the dehydrated are so much better!

Once the bean layer has cooled a little bit you can turn it into the bottom of your serving dish. I like to use a glass bowl so you can see all the delicious layers.


Next I added the guacamole, sour cream and then cheese. I topped mine with shredded lettuce, pickled jalapeno, and green onions. After the bean layer goes down you can really do anything you want in any order. But I recommend doing all your heavier items first like the sour cream and guacamole, and then adding all the other stuff on top.

Serve with your favorite corn chips. 


Hope you guys enjoy todays installment of appetizers. Happy Eating! 

Monday, January 12, 2015

Buffalo Chicken Dip

Today's recipe is Buffalo Chicken Dip. This is my favorite game day appetizer. I make it every year for the Super Bowl, it's so good and I rarely have leftovers. My Mom and I started making this years ago and we just haven't stopped. 

Perfectly served with celery sticks or your favorite crackers. My personal favorite are Carrs Crackers. 


Buffalo Chicken Dip

Ingredients: 
2 cups diced or shredded cooked chicken (get a rotisserie chicken if you want to cheat!)
1/4 cup Frank's Red Hot Sauce
1 cup Helman's mayo (plain greek yogurt if you want to be figure friendly)
1 cup shredded cheddar cheese
2 tablespoons finely chopped green onions
1 tsp lemon juice
1/4 cup crumbled blue cheese (or enough to cover the top)

Preheat oven to 375 F. Shred your chicken and then toss with the hot sauce (a fast and easy way to shreds your chicken is in a food processor). I like to do a mix of both hand shredded chicken and food processor chicken. It adds more texture to the dish.


While I prep the rest of my ingredients I like to go ahead and add the hot sauce to the chicken so it can soak in and almost marinate the chicken. 


Stir in remaining ingredients except blue cheese. Pour into a 1 1/2 quart shallow casserole dish, then sprinkle with blue cheese. 


Bake uncovered 20 minutes or until bubbling, serve hot with celery, chips, or crackers. 


I don't have a picture of this dip yet. Which is crazy because I've made it so many times. We even served it at my wedding reception! But I'll add one in soon. The Mr. and I are on a 6 day "shred" as we ramp up our home fitness program. But I'll be making it for the Super Bowl and will add a picture in then.   

Pictures are up. We made this for the Super Bowl party we went to yesterday. So yummy! 

Monday, January 5, 2015

Egg Roll Carnitas


The New Year always seems to be a time when I find myself making a lot of appetizer dishes. Lots of sporting events and social gatherings seem to always be happening from January through April prompting me to pull out my favorite small plates for friends and family.

So it seemed only fitting that this months recipe focus would be on appetizers. Having a few tried and true of these recipes always comes in handy. Over the next month I'll be posting my 4 favorite appetizers for you guys. I hope you enjoy todays installment of Egg Rolls. 

Egg Roll Carnitas
Cook time 1hr 30 min

Wonton wrappers
Sesame Garlic sauce – or any other flavor sauce you would like
10 baby carrots, chopped
1 red bell pepper, chopped
1 small head of broccoli, chopped
About 3-4 cups smoked pork (see recipe below)

You can really use any filler ingredients you want. That is the beauty of this recipe. I used what I had on hand in my kitchen, including leftovers! 


Put a small amount of olive oil in a large frying pan and heat the pan to a medium heat. Add the chopped broccoli, carrots and bell peppers. Add enough sauce to coat the vegetables without them drowning in it. 
Let them cook for about 5-7 minutes then add the pork and stir. Cook until vegetables are at a desired tenderness. I like mine a little more crisp so I cooked everything together just long enough to heat the meat and incorporate everything and make it warm.


Remove from the heat and put into your food processor. Pulse just a few times to get everything shredded down. You don’t want it to be a paste, but you don’t want a huge piece of bell pepper in your egg roll either.


Lay out your wrappers and put your filling towards one corner. Fold and roll as follows:


Use a little water to seal off the ends and make the wrappers stick to themselves.
I wrapped all of mine while my oil heated. This batch made enough filling for about 40 wonton wrappers.

You want the oil to be about 300-350 F. If you are like me, you don't like frying things because the popping oil scares you. Well keeping the oil on the cooler side will help with that. Just make sure the oil isn't too cool or it will just saturate your egg roll and make it really greasy. Also make sure your filling is locked up tight inside the egg roll. If only the wrapper is touching the oil than it's less likely to pop at you. 

I only used enough oil in the bottom of my pan to do one side at a time. Each side cooked for about 60-90 seconds. You are looking for them to turn a golden brown before you start flipping them over. Once they are crispy on all sides remove and set them onto a plate covered with paper towels to drain. 


Enjoy immediately or you can freeze them to enjoy at a later date. 
These make great appetizers for parties and are super easy to make. 


You can use whatever type of meat you would like in your egg rolls, chicken, beef, anything will work, you can even do just veggie rolls. But if you want to make the smoked pork I used this is what I did. 

Smoked Pork
Cook time: 4 hrs
Pork Shoulder
Water
Apple cider
Sea salt
Cumin

Sear the outside of the meat on the stove top and then put in a disposable foil baking tin. Add the water, sea salt, cumin, and apple cider. Place in the smoker and let it go on medium heat until the meat is falling apart when stirred or turned. We usually smoke it for about 4 hours on our Treager. 

This is the Pork we always make for Smoked Carnitas tacos (a different recipe for a different day). We had fed some missionaries serving in our area for our church and had some leftover meat, which is what I used for these egg rolls. 

Enjoy!